Don't forget to enter our Summer Giveaway !! Win a $25 credit to our website and choose the items you love. Ends July 31. Thanks for stopping by and be sure to join us back here Tuesday for another Inspiration from Pinterest, ( I will be taking Monday off camping, as it is my Birthday ) and we will also be posting pictures of our two new models :) Thanks for stopping by !
Friday, June 28, 2013
Enter our Summer Giveaway !
Don't forget to enter our Summer Giveaway !! Win a $25 credit to our website and choose the items you love. Ends July 31. Thanks for stopping by and be sure to join us back here Tuesday for another Inspiration from Pinterest, ( I will be taking Monday off camping, as it is my Birthday ) and we will also be posting pictures of our two new models :) Thanks for stopping by !
Monday, June 24, 2013
Make It Monday- A 4th of July Top Hat Craft for 18" American Girl Doll
Make it Monday June 24th
This week I wanted to show you a fun and easy way to make a Top hat for your doll for July 4th. Using items you may already have on hand you can make one for each of your dolls!
To create your own you will need:
-A toilet paper Tube
-Scissors
-A juice glass
-A juice glass
-Cardboard
-Felt in Red White and Blue, or Fun Foam
-Silver Rick Rack or you can use Stickers
to embellish your hat
-Ribbon or Yarn
-Tape
-Glue Gun or Glue Dots
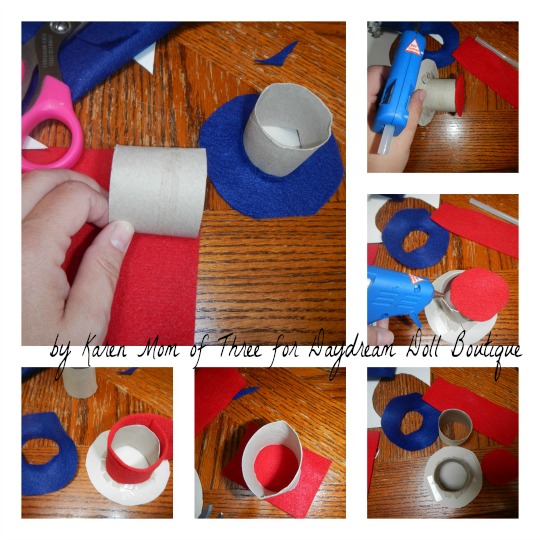
Step 1- Cut your Toilet Paper Tube in Half. Then use your scissors to snip ½ inch snips around the edge of your tube as shown above. Fold the flaps you created out.
Step 3- Place your cut out hat base on your
blue felt. Cut out a felt circle.
Step 4- Trace your toilet paper tube on the center of your felt. Then cut out that center of the felt. Slip the felt over your toilet paper tube to make sure it fits as shown in the photo above.

Step 6- Use your toilet paper tube to
measure a hat band. Cut out the felt and place it a side.
Step 7- Use your toilet paper tube end and
cut out the hat top
Step 8- Use your glue gun to attach the
felt top to the hat.
Step 10- Continue gluing it into place.
Step 11- Cut your white strips from felt or
fun foam, I cut mine ½ inch thick and then glue into place along the hat wall
as shown.
Step 12- Embellish your hat as you wish, I
used silver rick rack but you can use stickers or other patriotic items. Then
Place the hat brim felt over your hat wall.
Step 13- Use your hole punch to cut a hole
in the cardboard only. Repeat on the opposite side.
Step 14- Cut two 15 inch pieces of ribbon
or string and tie one on each side through the hole you created, then use the
glue dots or more glue from your glue gun to glue the hat brim felt into place.
Step 15- tie the hat on your doll and
enjoy!
I hope you enjoyed today’s craft and I look
forward to sharing more crafts with you again soon~Karen Owen aka Karen Mom of
Three
Thursday, June 20, 2013
New Styles at Daydream
New styles have arrived at Daydream ! Be sure to check out our cute new styles, I'm loving the pink fringe boots :)
Monday, June 17, 2013
Inspired By Pinterest- Whimsical Princess Crowns for 18" American Girl Dolls
So I saw this cute idea on Pinterest. They actually made it for little girls but I thought it would be perfect for a doll craft at a birthday party, summer crafts or anytime.
They are super easy and use items you might already have.
Supplies Needed:
Toilet Paper Rolls
Paint or markers
Embellishments such as sticky gems, feathers, stickers etc.
Stretchy elastic( I used sewing elastic I had bought from Hobby Lobby)
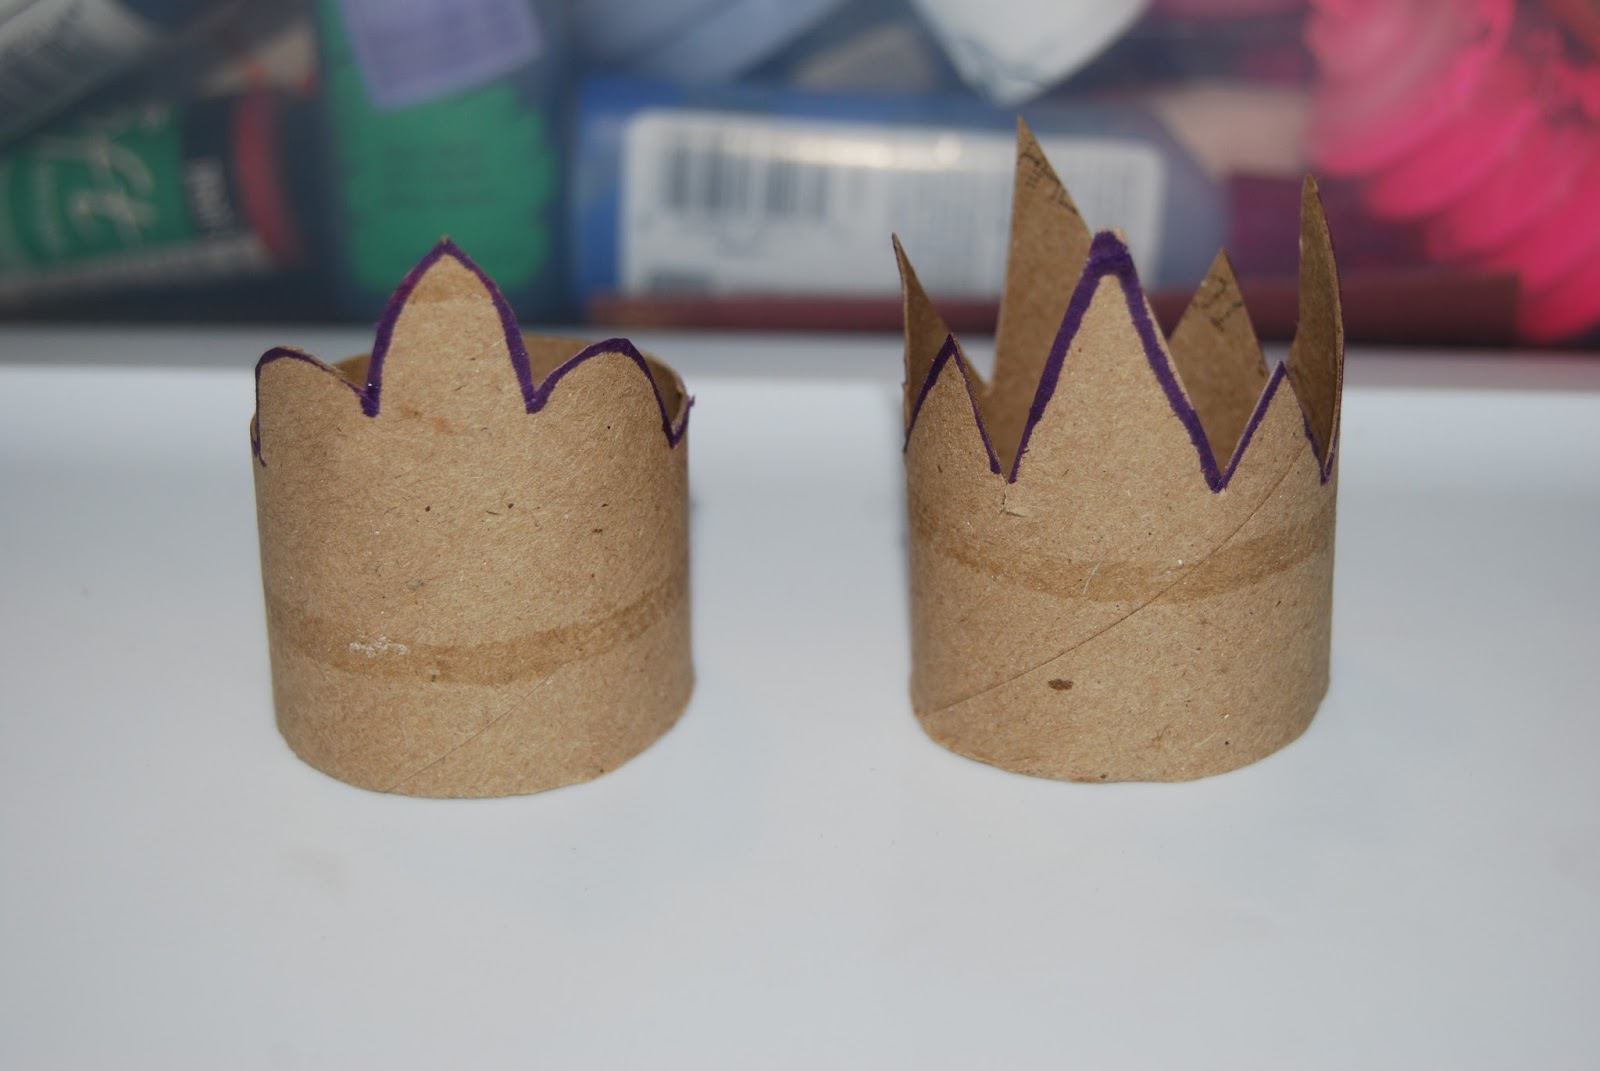
1) Cut your rolls in half.
2) Trace your shape you want and cut out.
3) Paint, I did two coats.
4) Decorate, and voila, your done !
On mine I used stickers and stick on gems and embellished with a marker.
Friday, June 14, 2013
Enter our Summer Giveaway !
Don't forget to enter our Summer Giveaway !! Win a $25 credit to our website and choose the items you love. Ends July 31. Thanks for stopping by and be sure to join us back here Monday for another Inspiration from Pinterest.
Monday, June 10, 2013
Make It Monday - American Girl 18" Doll Ice Cream for Two Craft
Make it Monday Ice Cream For Two
Today I wanted to show you an easy way to
make two ice cream cones for your dolls.
To create your own you will need:
-Tan Felt for the cone
-Two Large Pompoms in whatever color you
wish your ice cream flavor to be
-Scissors
-A Ruler
- Glue dots or Glue Gun
- *Seed beads for Sprinkles
Step 1- Use your ruler to measure from one
corner of your felt 2 inches. Cut a straight line across your felt where the 2
inch mark is. You will now have a triangle.
Step 2- Cut your Triangle in half up the
middle as shown in the photo above. You now will have two triangles; these will
be your cones.
Step 3- Start rolling a cone shape as shown
above, as you roll add a line of glue or use your glue dots to hold the cones
shape.
Step 4- Trim the rim of your ice cream cone
Step 5- Place a line of glue inside your
cone (or add more glue dots) and place your pompom scoop of ice cream into
place. Let dry.
Step 7- Repeat Steps 3-6. Let dry, then
place the ice cream cones in your dolls hands.
I hope you enjoyed today’s post I look
forward to sharing more doll play crafts with you again soon.~ By Karen Owen
aka Karen Mom of Three
Tuesday, May 28, 2013
Make it Monday came Tuesday ! American Girl 18" Doll Flapper Headbands Craft- So Cute :)
Another fun craft from Karen, due to the Holiday here I am posting it a day later..... enjoy !
Make it Monday May 27th 2013
Today’s craft is inspired by the roaring
1920’s and the New Movie The Great Gatsby. Using items I had in my craft box my
friend and I had the most fun creating these Flapper Headbands for my dolls.
To create your own you will need:
-12 inches of sequin trim (we used elastic
sequin trim)
- Feathers
-Buttons
-Brads
-Glue Gun
-Velcro
-Scissors
-Ruler
-Your Doll
Step 1- Measure and cut your sequin to 12
inches
Step 2- Plug in your glue gun so it warms
up. Choose your feathers, button and brad.
Step 3- Layer your feathers and glue them
into place.
Step 4- Add a line of glue in the center at
the 6 inch mark and gently press your feathers in place.
Step 5- Choose your button and open a brad
for embellishment. Thread the prongs of the brad through the button holes and
bend at the back.
Step 6- Add a dab of glue on the feathers
and press the button into place, let it dry.
Step 7- Cut a piece of Velcro to 1/2 . On
the right end of your sequin headband place a dab of glue on the shiny side and
lay the back side of your Velcro on top of the glue. Press down gently.
Step 8- add a dab of glue to the inside of
the opposite end of the headband, and press the back side of the remaining
Velcro in to place. Let dry.
Step 9- Try your headband on your doll and
enjoy!
Subscribe to:
Posts (Atom)