Showing posts with label 18 inch Doll Craft. Show all posts

Monday, January 4, 2016

Make It Monday! A Lea Clark Inspired Photo Album

Here at Daydream Doll Boutique we are so excited about the new girl of the year doll from American Girl Lea Clark! Lea loves to take photos of her experiences in Brazil and we thought it would be fun to make a doll sized photo album for our dolls. You can print off small google images for Brazilian animals or you use stickers or draw your own pictures to put in side.

To make your own you will need:
-Small party sized note books (3 by 4 inches)
-Fun Foam in any color
-Scissors
-4 hair elastics (I picked Lea themed colors such as orange, green, pink and yellow)
-Buttons or charms
-Scrapbook paper
-Stickers
-Pen or Pencils
-Glue Gun and Glue Stick
Step 1- Gather all your supplies and plug in your glue gun. Trace your book on a piece of fun foam and cut it out, repeat and cut out two pieces.
Step 2- Add two lines of glue on the front of your note book and cover with the fun foam. Turn the book over and repeat on the other side.
Step 3- Open your book to the center and slide three elastics into place, they should fit and stay in place naturally, if the don't you can glue them into place.

Step 4- Cut one elastic open and use it to tie all three together at the top right corner of your album as shown in the photo above.
Step 5- Add a button embellishment or charm at the place of the knot

Step 6- Add a line of glue and then press in a piece of colorful scrapbook paper into the center of your album cover. Add the word photos or vacation or what ever you would like to the front! Stickers look great too!
I hope you enjoyed today's craft and we invite you to share your thoughts with us in the comment section below! 
I look forward to sharing more craft ideas with you again soon.
~ by Karen M.Owen aka Karen Mom of Three 

Monday, November 9, 2015

It's Make It Monday! Set The Table For Thanksgiving Tea

The days are growing shorter as the dark comes earlier it seems each night. By the time I finished my craft for photos the sun had long since set!  For today's Make It Monday craft I am sharing with you an easy way to add a little glam to your dolly tea table using items you may have at home.

Setting a nice table makes all the difference when you are entertaining with friends and dollies are no exception.  To share today I am showing you how to use fun foam, felt, ribbon, left over artificial flower leaves and a sharpie to create a festive fall themed or Thanksgiving themed tea for yourself and your dolls.

To make your own you will need:
-Light brown, tan, or another fall colored sheet of fun foam
-Brown Felt
-A Ruler or measuring tape
-A Gold or Copper Colored Sharpie Marker
-Scissors
-1/4 thick Ribbon


Step 1- Remove the leaves from a stem of an artificial flower, pull off the small plastic part that held the leaves into place and then trim apart the leaves.
Step 2- Use a Sharpie Marker to write your dolls name on the leaf. Repeat for as many dolls that you have attending the party.

Step 3- To create each napkin I measured and cut a 4 inch by 4 inch square out of felt. Then I placed the felt over my finger to form the napkin shape. Next I wrapped ribbon around the center and tied it into place.
Step 4- Cut out place mats for your dolls using fun foam. I cut 3 1/2 inches by 2 1/2 inch rectangles but you can make yours larger if your table has space.

Now you are ready to set the table for your dolls tea party! I used items I had from my own mini tea set collection to set this table and I am thrilled with how it turned out and so was my doll!
Thank you for joining me for today's Make It Monday Craft! I look forward to sharing more dolly craft ideas with you soon.~ Karen Owen aka Karen Mom of Three

Monday, October 12, 2015

Make It Monday! Cherry Hand Pies! Happy Columbus Day & Canadian Thanksgiving!

Karen here and it is Thanksgiving Monday here in Canada. Popular where I live are hand pies. Hand Pies are small pies you can hold in your hand and are some of the most delicious pies around! We even have a food truck that sells only Hand Pies!
Here is how you can easily make doll sized hand pies!
To make your own you will need:
-Tan or Light brown Fun foam
- Small Red Pompoms
-Scissors
-Low temp glue gun and glue sticks
-Ruler

Step 1- Assemble all your supplies and plug in your glue gun. Use your ruler to cut out 4 1 inch by 2 inch pieces of fun foam.
Step 2- Use your scissors to cut 2 slits in the fun foam that look like air holes for your hand pie.

Step 3- Add two dabs of glue on the other piece of fun foam and press the pompoms into place
Step 4- Place the piece of fun foam with the slits over the top of the pom poms and run a line of glue down one side. Carefully press and hold it into place until it is set or dry.
Step 5- Add another line of glue on the other side and press the other side closed. Press and hold until set.
Step 6- *Optionally you can add glue at the ends of the hand pies but I found mine held tight with out it. Repeat steps 1-6 on your remaining fun foam to create the other hand pie.

These little pies will fit nicely in your dolls hand and look great on a dolly plate too!

Monday, September 28, 2015

Make It Monday! Paint Your Own Witch Hat!

Karen here and today I am sharing an easy craft you can make for your doll. At my local craft store I bought a cardboard paper mache your own you will need:
-1 Paper Mache Witches Hat
-black paint
-paint brush
-Halloween stickers
-Optional Recycled Bow

Step 1-Assemble all your supplies and remove the sticker from the bottom of the hat.
Step 2- Paint the outside of your hat from brim to tip and allow it to dry.
Step 3- Turn your hat over and paint the bottom of the hat and touch up any patches that need it on the hat.
Step 4- Once your hat is dry add your Halloween stickers and if you would like a bow. 
Your hat is now ready for your doll to wear!

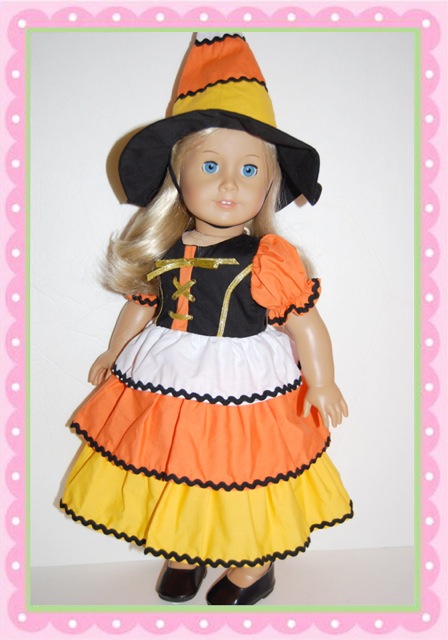
My Ruthie is wearing the Candy Corn Witch Costume that is available in the Daydream Doll Boutique Store by clicking here.

Monday, September 14, 2015

Make It Monday! No Sew Fall Apron!

Karen here and today I wanted to share with you an easy doll craft, a no sew apron for fall!
Using items you may already have on hand you can create these little aprons for your dolls or as a party craft!
To make your own aprons you will need:
-Felt
-Ribbon (4 strips cut to 11 inches)
-Scissors
-A Marker
-A Small Flower or Leaf for decoration
-Buttons for decoration
-A Glue Gun and Glue Sticks.

Step 1- Fold your felt in half length wise and cut up the center fold. One piece of felt will give you two aprons! Plug in your glue gun.
Step 2- Fold that felt in half length wise again and use a marker to mark where you will cut. Start one inch from the open ends and draw a curved line down three inches. Cut out what you have marked as shown in the photo above and open your apron and lay it flat.
Step 3- Fold up the bottom edge of your apron up 2 1/2 inches and use your hand to make a line.
Step 4- Use your glue gun to run a line of glue along the open sides of the fold you just made. Gently press the felt together. Allowing it to dry and cool. This creates the front pocket of your apron.
Step 5- Turn your apron over. If you have not yet cut your ribbon cut 4 pieces to 11 inches.
Step 6- Add a dab of glue on each side of the back of the apron pocket and press one ribbon end into each dab of glue.
Step 7 - Add more glue at the top at the corners and press in the remaining two pieces of ribbon. Allow it to dry and turn it over.
Step 8- Add your flower or leaf embellishment. Attach with glue and decorate with a button as I did.
Now your apron is ready for your dolls to wear!

I look forward to sharing more doll crafts with you again on our next Make It Monday!~ Karen Owen aka Karen Mom of Three 

Friday, August 21, 2015

Our Newest PDF Sewing Pattern is Here !

Our super cute matching apron pattern is here, it makes a perfect gift and is so fun for the Holidays!
It's an easy project and can make use of all your extra fabric pieces you've been saving.
Find it in our Esty shop now


Monday, August 17, 2015

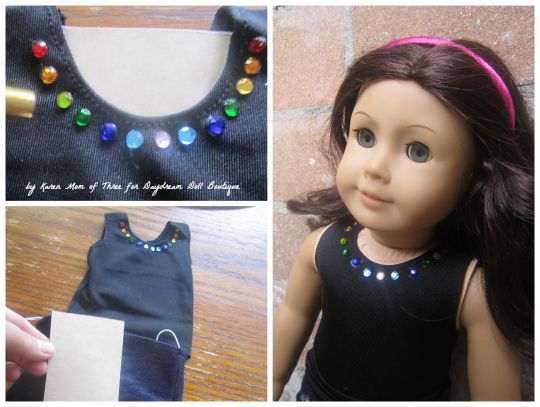
Make It Monday! Add Gem Crystals To Your Dolls Outfits To Create Fun New Looks!

Karen here and I just picked up a really fun tool and kit to add gem crystals to my dolls clothing! This heat seat tool and gem crystals are a fun way to decorate your dolls clothing and give them a new look!

To create an outfit like the one I made for Ruthie pictured above you will need:
-A Rhinestone Setter hot fix applicator or Tulip Glam It Up Cordless heat set tool
-Glam It Up Iron On Crystals
-A Doll Outfit I used a Springfield Doll Tank Top and Pair of shorts.
-Recycled Cardboard

Step 1- If you are using a Rhinestone Setter with a cord, choose the right tip, screw it into place and then plug it in and turn it on to heat up.
Step 2- Lay out your doll outfit you wish to add the gems too, place a piece of cardboard between the fabric.


Step 3- Place your crystals where you would like them to be, I used a rainbow of colors around the collar of the neck line on the tank top, along the bottom of each short hem and to define where I think pockets should be on this pair of shorts.


Step 4- Use the heat setter and cover the gem crystal with the setter. Count to the recommended seconds for each gem stone and then carefully pull the setter back and work on the remaining gem stones.

Step 5- Once they are all attached to the outfit and set you can place the outfit on your doll!

I hope you have fun adding gem crystals to your dolls outfits, hair accessories, shoes and so much more!
I look forward to sharing more doll craft ideas with you again soon!~ Karen Owen aka Karen Mom of Three
Monday, July 20, 2015

Make It Monday! Make A Puppy Bed!

Karen here and for this weeks Make It Monday feature I made a puppy bed for my Our Generation Puppy. This is a really easy and fun craft you can make for your own dolls puppy or kitty!
To make your own you will need:
-1 empty pop tart box
-duct tape
-a ruler
-scissors
-a pencil
-a piece of felt
-a coffee mug
Step 1- Use a ruler  and your pencil to measure 2 1/2 inches up from the bottom and draw a line all the way around the box bottom.
Step 2- Cut along the line you created and remove the top of the box.
Step 3- On one side of the box place a coffee mug and then use your pencil to trace around the mug
Step 4- Cut out the shape you traced and your box will look like mine.

Step 5- Cover your box with duck tape. "U" shape you created and then line the inside of the box with more duck tape.

Step 6- trace your box onto a piece of felt and cut it out for the bottom of your pet bed. Place it inside your box and your pet bed is ready to play with!

I hope you enjoyed today's Make It Monday Post and I look forward to sharing more crafts with you soon!
~ by Karen Owen aka Karen Mom of Three