

Tuesday, September 10, 2013
Visit us at Mutton Hollow Country Barn this week !
We will be up in Kaysville this week, so if you are in the area stop by. On Friday we will be posting another inspiration from Pinterest, I have pinned some really fun things lately and am excited to share them with you. Thanks for stopping by :)


Wednesday, September 4, 2013
Monday, September 2, 2013
Make It Monday- Duct Tape Bangle Cuffs Craft for 18" American Girl Dolls
Make it Monday Sept 2
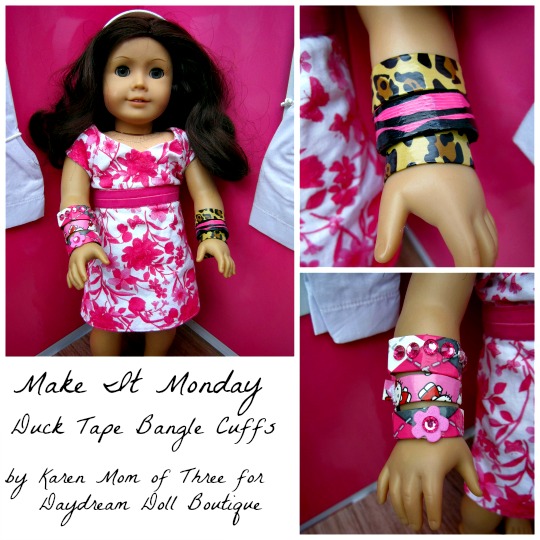
Today I wanted to share with you an easy
and fun way to make bangle cuffs for your dolls using items you may already
have on hand. These easy to make bangle cuffs would make a great party craft or
sleep over activity.

To create your own bangle cuffs you will need:
-A toilet paper tube
-Scissors
-Duct Tape
-Gem stickers
-Fun Foam Stickers
-Peel and Stick Velcro Dots
-Your Doll
-A Ruler
Step 1- Use your ruler to measure ¼ inch to
½ inch lines on your toilet paper tube
Step 2- Cut your Bangles Out
Step 3- Slice your toilet paper tube strips
as shown in the top middle photo above

Step 4- cut from your tape roll enough tape
to cover your cardboard. You will have to half your tape lengthwise. Then place
your cardboard in the middle of the tape and fold the edges over.
Step 5-Take one of the Velcro dots and
place it on top of its mate. Cut it in half you will have enough to make
another bangle with the left over Velcro dot.

Step 6- Remove the backing from your Velcro
dot and place the bangle on your dolls arm. Then place the Velcro dot, sticky
side down on the outside edge of your dolls bangle like in the photos above.
Step 7- Peel back the remaining Velcro dot
backing and wrap the other side of the bangle tightly over it and press into
place. Trim remaining over hang.
Step 8- Repeat steps 3-7 on the remaining
bangles

Step 9- Embellish your bangles as you like
and layer them on your dolls arms! Make as many as you want and share with your
friends!
I hope you enjoy today’s Make it Monday
Craft~ by Karen Mom of Three for Daydream Doll Boutique
Saturday, August 24, 2013
Visit us this Coming Week at Swiss Days !
Our biggest show of the year is right around the corner, and if your in the area be sure to stop by. We will have an amazing selection of doll clothes and some really fabulous handmade items you won't find online. Our booth is B34. It's going to be a lot of fun, so we hope you can make it.


Located in the town square in Midway, Utah.
Friday Aug. 30 and Sat. Aug. 31
8am -8pm
We will have doll bean bags, matching apron sets, nightgowns and more.
We even have a few of this cute print below in stock.

Monday, August 19, 2013
Make It Monday-Slipper Chair and Footstool for Mini American Girl Dolls Craft
Make it Monday August 19

After spending so much time on Pinterest
looking at vintage furniture I thought it would be fun to try to make a slipper
Chair and Foot Stool for my mini dolls. Today I will show you how to make your
own for your dolls using items you may already have on hand or can easily find
at the dollar store.
To make your own Slipper Chair and Foot
Stool you will need:
-1 toilet paper tube
-1 cardboard egg carton
-Felt
-*1 inch square of fiber fill, toilet paper
or more felt for the chair cushion.
-Dollar store ribbon, lace and
embellishments
-A glue gun
-Scissors
-Tape
-A Ruler
-A Pencil

Step 1- Use a ruler to make a mark at 1 ½
inches from the end of your toilet tube.
Step 2- Use your scissors to cut down to
that line and across 2 inches and back up. This will create your dolls chair
back rest

Step 3- Use your scissors to cut out one of
the egg cups from your carton. You will slide this cup inside your toilet tube
and tape or glue into place.
Step 4- Trim the back rest edges as shown
in the photo above

Step 5- Use your felt to cover your chair
back starting on the inside as shown above. Use your glue gun to glue the felt
in place. Do not glue the back down yet, just the front.
Step 6- Trim the access from the chairs
back rest.

Step 7- Cover the bottom of your chair with
more of your felt glue into place. Glue the felt to the chair back at the back
and sides.

Step 8- Use your lace trim to cover the
bottom of your chair to create a chair skirt. Glue as you go starting at the
middle back of your chair. Add a ribbon trim to embellish.

Step 9- Cut a 2 inch square from your felt
and one 1 inch square of fiber fill.
Step 10- Place the fiber fill on top of
your felt, use hot glue to attach the felt to the fiber fill. Use a pencil to
press the felt into the fiber fill.
Step 11- Once you have gone all the way
around your cushion is ready to glue into place.

Now to create the foot stool
Step 1- Cut another egg cup from your egg
carton.
Step 2- Cut a two and a half inch piece of
felt and glue around your egg cup as shown in the photo above.
Step 3- Once the felt is glued to the sides
fold and glue the remaining felt to the top of the egg cup. Embellish the stool
as you did the bottom of the chair.
Step 4- Once the top is covered cut a piece
of felt into a circle and glue on top of the folded felt.

Step 5- Add a ribbon bow to the back of the
chair and the foot stool with felt.
Once your chair is dry, your dolly can put
her feet up!

I hope you enjoyed today’s Make it Monday
craft! I look forward to sharing more ideas with you soon. Today I used my mini
American Girl Doll Rebecca wearing a dress from Auntie Robin’s Etsy Shop https://www.etsy.com/shop/auntierobin
~ Karen Owen aka Karen Mom of Three
Thursday, August 8, 2013
Enter our Back to School Giveaway !

Your doll will be ready for school with everything in this amazing Giveaway. We have put together some of our favorite doll size items and comfy school outfits. All of the doll size accessories fit perfectly into the doll size backpack. Here's what's included:
Grey Hoodie Outfit with Matching Shoes
Plaid Jumper with Boots
Doll Size Backpack
Three Notebooks
One Mini Pencil
One Mini Paint Set
One Doll Size Tablet
One Doll Size Smart Phone
One Doll Size I Pod
How to Enter:
1) Become a follower, if you are not already
and:
- Go to the Daydream Doll Boutique website and take a look around. Come back here and leave a comment telling us: your favorite Shoes and what you would pair them with.
- Get bonus entires by letting your friends know about the Giveaway. Get one extra entry for the following, please come back and leave another comment telling us where you shared it:
- Post about it on your own blog or in a forum
- Share it with your friends on Facebook
- Twitter this Giveaway
- Post it on Pinterest
- Email it to Friends and Family
Rules
- Leave a comment(s) no later than midnight Sept. 19, 2013
- If you are under 14, you need a parents permission to enter.
- Please claim your prize three days after the close of the Giveaway or we have to draw another name
- Good Luck Everyone !
- Winner is decided by Random.org
Monday, August 5, 2013
Make It Monday- Back to School Binder for 18" American Girl Doll
Make it Monday August 5th –Back to School Binder

Well it is getting to be that time of year
again and with school starting everywhere you look you find school supplies!
Today’s craft is inspired by the back to school flyers, school supplies and
doll sized note books I found at my local party store. I love binders and think
they are a great way to get organized. Today I will show you how to make your
own.
To create your own Back to School Binder
you will need:
-Cardboard (I used a crystal light drink
box. Cut to 2.5 inches by 3 inches on each side using the side of the box
-Scissors
-Felt
-Hot Glue Gun & Glue Stick
-Buttons
- 2 brads
-Scrap lined paper
-A Ruler
-A hole punch
- ½ inch ribbon two pieces cut to 6 inches
each

Step 1- Assemble your supplies. Measure and
cut out your binder shape from your cardboard as shown in the photo above.
Step 2- Heat your glue gun. Wrap your
binder shape in felt and secure with glue.
Step 3- Use your hole punch to punch two holes for your brads, which will
secure your paper in a later step.

Step 4- Continue wrapping and securing your
felt around your binder shape as shown in the photos above. Seal the edges with
more hot glue.
Step 5- Push your brads through the two
holes you made, on the outside of your binder set aside.

Step 6- Cut Scrap Lined Paper to fit inside
your binder.
Step 7- Use your hole punch to make
matching holes on your paper
Step 8- Bend the brads to keep your paper
in place. Then fold the paper to fit match the folds of your binder.

Step 9- Optional add felt pockets and ties
on the inside of your binder. Cut felt to fit and glue into place. Repeat on
the inside of both sides.
Step 10- Use your ribbon ties and glue one
to the inside edge under your felt pocket as shown in the photos above.
Step 11- Decorate and embellish the outside
of your binder; I used fun foam flowers and glued small buttons to the center
of the flower. Once dried tie a bow in your ribbon and give to your doll to
take to school!

Subscribe to:
Posts (Atom)