Friday, September 20, 2013

Our Back to School Giveaway Winner is.....


Thanks to all you who came out and entered our fun Back to School Giveaway. It's one of my favorite Giveaways I've done.  Our lucky winner this round is Mommy Applause. Please contact us within three days to claim your prize.

We will be posting our next giveaway shortly so be sure to check back, thanks for stopping by.

Wednesday, September 18, 2013

Visit us this Week at Simple Treasure Boutique

We will be at Simple Treasure this week, we have tons of new styles you will find there, and we will be posting them shortly online. Thanks for stopping by :)


Monday, September 16, 2013

Make It Monday-Gem Stone Glasses for 18" American Girl Doll Craft


 Make it Monday September 16th


For Today’s Make it Monday Craft I was inspired to make embellished gem stone glasses for my dolls like some I have seen on line.  These Gem Stone Glasses took only a few minutes to make and cost under $5. Making them one of my most favorite Make it Monday Crafts Ever!


To create your own Gem Stone Glasses you will need:
-A pair of doll glasses. I used Springfield Glasses I bought at Michael’s the Craft Store
-A Package of small gem stones. (Mine were in the discount bin and cost only 50 Cents with lots of gems left over)
-Super glue or nail glue (I got mine at the dollar store for $1)
-A pair of tweezers
-A tooth pick
-Your Doll


Step 1-   Assemble all your supplies.
Step 2- Place your gem stones where you would like them to be without using the glue. Step 3- Once you are happy with the placement; begin carefully gluing the gem stones in place, one by one. Using a pair of tweezers and a tooth pick to press them into place.


Step 4- Be sure to embellish your glasses on the sides too, I added one larger gem stone in the same colors on the arms of each side of my glasses. Let dry and then try on your doll!


I hope you have enjoyed today’s Make it Monday Craft!

 I look forward to sharing more craft ideas with you again soon. 

Karen Owen aka Karen Mom of Three
Today I used my Springfield Doll Madison as a model.  

Friday, September 13, 2013

Inspired by Pinterest- 18" Doll American Girl Maxi Skirt

I have been pinning some really fun things lately and this one really caught my eye. I couldn't wait to try it.


The original tutorial is from here: PA Country Crafts

It was a super easy and quick sew. I thought it came out so cute.

I did do a couple of things different. As you can see I made mine into the very popular chevron style instead of a plain front. This was easy to do, I just cut the front piece into two pieces instead of one. I did not add any extra seam allowance since its a stretchy knit.

Also I did not want my waistband as bulky so I did half of her measurement and I did not fold it over, just left it flat on the dolls tummy so it layers nicely.

Want more exciting doll ideas from Pinterest ? Be sure to follow us :


Join us back here Monday for another fun idea from Karen. Thanks for stopping by :)

Tuesday, September 10, 2013

Visit us at Mutton Hollow Country Barn this week !

We will be up in Kaysville this week, so if you are in the area stop by. On Friday we will be posting another inspiration from Pinterest, I have pinned some really fun things lately and am excited to share them with you. Thanks for stopping by :)


Monday, September 2, 2013

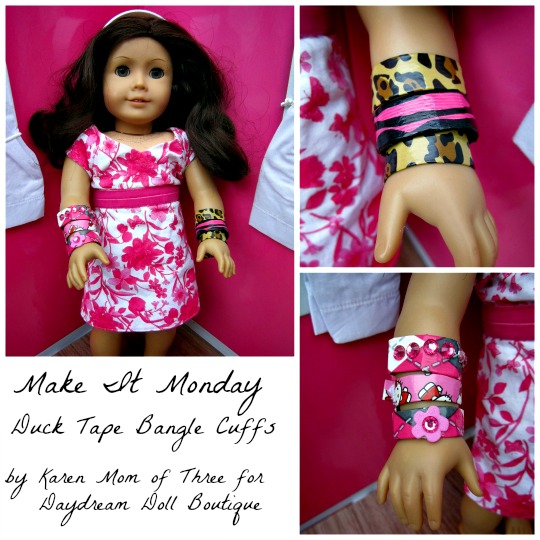
Make It Monday- Duct Tape Bangle Cuffs Craft for 18" American Girl Dolls


 Make it Monday Sept 2


Today I wanted to share with you an easy and fun way to make bangle cuffs for your dolls using items you may already have on hand. These easy to make bangle cuffs would make a great party craft or sleep over activity.


To create your own bangle cuffs you will need:
-A toilet paper tube
-Scissors
-Duct Tape
-Gem stickers
-Fun Foam Stickers
-Peel and Stick Velcro Dots
-Your Doll
-A Ruler
Step 1- Use your ruler to measure ¼ inch to ½ inch lines on your toilet paper tube
Step 2- Cut your Bangles Out
Step 3- Slice your toilet paper tube strips as shown in the top middle photo above


Step 4- cut from your tape roll enough tape to cover your cardboard. You will have to half your tape lengthwise. Then place your cardboard in the middle of the tape and fold the edges over.
Step 5-Take one of the Velcro dots and place it on top of its mate. Cut it in half you will have enough to make another bangle with the left over Velcro dot.


Step 6- Remove the backing from your Velcro dot and place the bangle on your dolls arm. Then place the Velcro dot, sticky side down on the outside edge of your dolls bangle like in the photos above.
Step 7- Peel back the remaining Velcro dot backing and wrap the other side of the bangle tightly over it and press into place. Trim remaining over hang.
Step 8- Repeat steps 3-7 on the remaining bangles


Step 9- Embellish your bangles as you like and layer them on your dolls arms! Make as many as you want and share with your friends!
I hope you enjoy today’s Make it Monday Craft~ by Karen Mom of Three for Daydream Doll Boutique